
A pay application is a bill for part of a job. You did some of the work, so you ask for some of the money. That's the whole idea. Everything else on the form is just a way of showing your math so the person paying you can check it.
This guide walks the form one box at a time, with a picture of each part and what to type in it. Nothing here assumes you've filled one out before. If a box doesn't apply to your job, you can leave it empty or switch its whole section off — the form only prints what you use.
The one thing worth knowing before you start: this form has three kinds of boxes. Boxes you fill in. Boxes the page works out for you — any grey number that moves as you type is calculated, and you can't type over it. And a few that are yours on the first application and carried forward after that, once this site has an earlier application of yours to carry from.
That third kind matters if you're picking this site up in the middle of a job you've been billing elsewhere. There's no earlier application here for the site to read, so the history — what you've already billed, and what you've already been paid — is yours to enter once, by hand. From your next application onward it carries itself.
Who is paying whom
The top of the form is names and addresses. It answers three questions: who wants the money, who's being asked for it, and which job this is about.
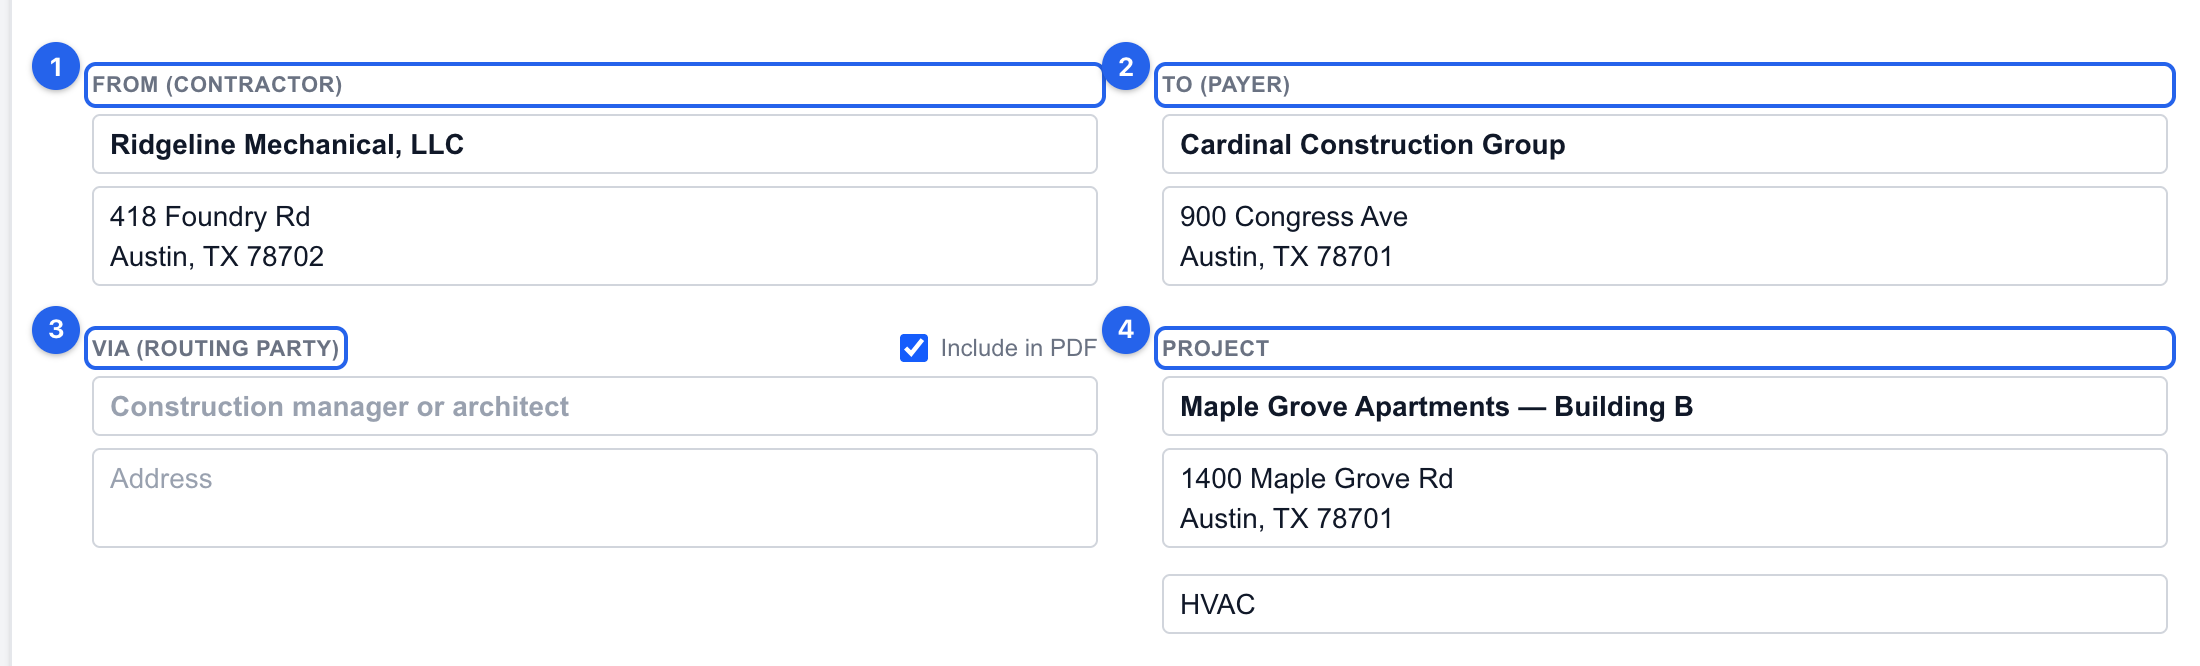
- 1From — You. Your company's name and address, exactly as you want it printed on the paperwork and on the cheque.
- 2To — Whoever pays you. Usually the general contractor who hired you, sometimes the building's owner. If you're not sure, look at who signs your contract.
- 3Via — Optional. Some jobs make you send the application through an architect or construction manager first, who checks it and passes it on. If nobody does that on your job, leave it blank and untick “Include on document”.
- 4Project — The job. Its name, its address, and what you're doing there (“HVAC”, “Electrical”). The name is also how this site keeps your applications for the same job together, month after month.
Which month is this?
The next strip says which slice of time you're billing for, and sets the two retainage rates. Retainage is money the payer is allowed to hold back until the job is finished — more on that in a moment.

- 1Application No. — Which bill this is: your first is 1, your second is 2. If you've already sent some outside this site, just carry on from where you were. Nothing on this site depends on this number being right — it's printed for your payer's filing.
- 2Period To — The last day of the work you're billing for. If you're billing for June, this is June 30. Everything you completed up to that date belongs on this application; anything after it waits for the next one.
- 3Contract Date — The day you signed the contract for this job. It never changes from one application to the next.
- 4Project Nos. — Optional. Any job number your payer uses to identify the project. It helps their accounting team find you faster; leave it blank if you don't have one.
- 5Retainage — Completed Work — The percentage held back from work you've finished. Ten percent is the most common. If your contract doesn't hold retainage, set it to 0 (or switch the retainage section off).
- 6Retainage — Stored Materials — The same idea for materials sitting on site but not installed yet. Usually the same percentage as above.
Retainage in one sentence: the payer keeps a slice of every payment as a deposit against you not finishing, and hands it over at the end. You still earned it — you just don't get it yet.
The schedule of values — the heart of the form
This is the list of everything you agreed to do, with a price against each item, and how much of each one is done. Split the job into pieces a stranger could picture: “Rough-in ductwork”, “Rooftop units”. Five to fifteen lines suits most jobs.
The list covers the whole contract, from the first application to the last. Every item you agreed to do gets a row, including the ones you haven't started and the ones you won't touch for months. A line you did nothing on this period still belongs here — it just carries $0 in “This Period”. The same rows, in the same order, at the same prices, appear on every application; what changes each month is how much of each one is done.
That's why the prices, added together, have to equal your contract amount (plus any change orders). Leaving out the work you haven't started makes the total come up short, and a schedule that doesn't reconcile with the contract is the first thing a payer bounces.

- 1Description of Work — What this piece of work is, in words your payer will recognise from the contract.
- 2Scheduled Value — What that piece of work is worth — the price you agreed for it. This never changes from one application to the next unless a change order changes it.
- 3Previous — How much of that piece you already billed on earlier applications. On your very first application this is $0. After that, this site carries it forward for you.
- 4This Period — How much of the line item you finished since your last application, in dollars. If you bill every month, that is this month's work. If you skipped a period, it is everything completed since the last application you sent. If you finished half of a $62,000 line item, type 31,000. If you didn't touch it, leave it at $0.
- 5Stored Materials — Materials you've bought and have on site, but haven't installed yet. Bill them here so you're not out of pocket; when they go in, move the amount over to the work columns.
- 6Total to Date — Calculated. Previous + this period + stored. It's what you've earned on that line since the job started.
- 7Balance — Calculated. What's left on that line. When it reaches $0, that piece of work is fully billed.
“This Period” is the box that decides what you get paid on this application. Every other money box is either background or worked out for you. A form with nothing in This Period asks for nothing.
Change orders — when the job changes
A change order is extra work (or removed work) your payer approved after the contract was signed. It changes what the job is worth, so it can't just be quietly added to a line — it gets its own place on the form.
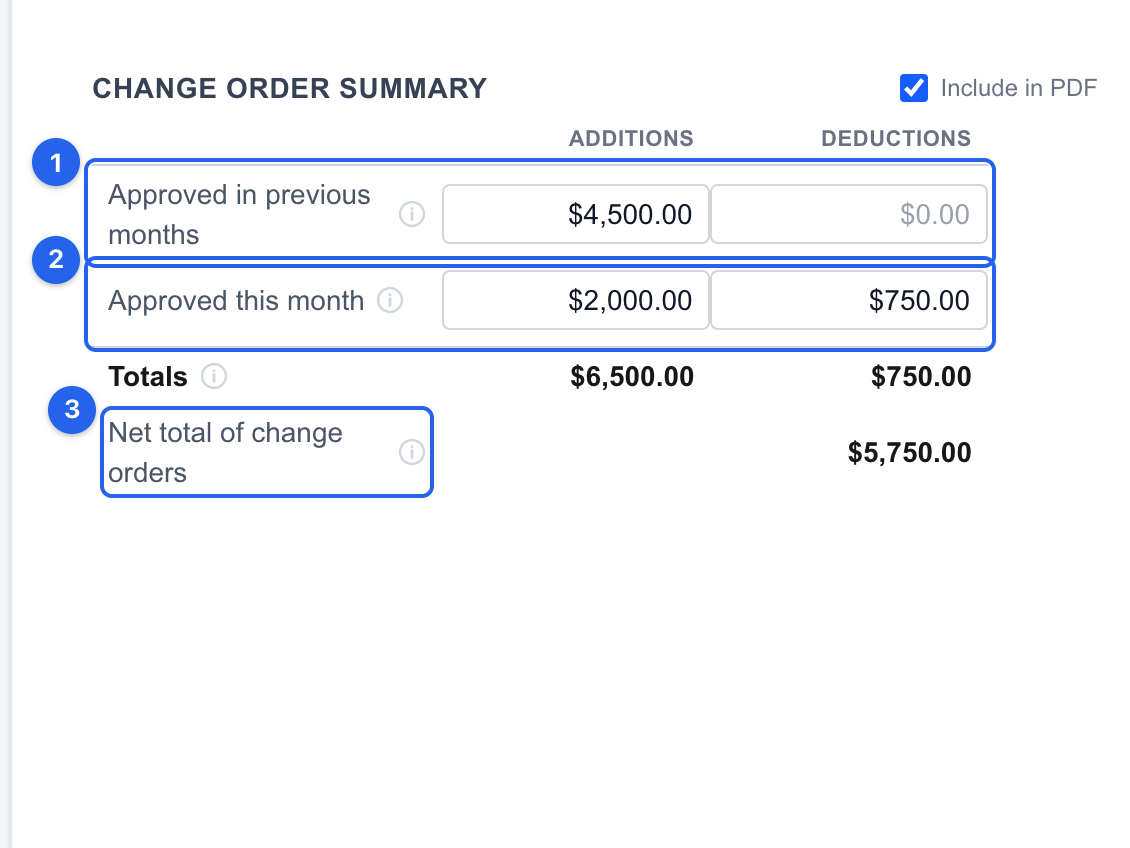
- 1Approved in previous months — Change orders that were already approved and already on an earlier application. Additions on the left, credits (work removed) on the right.
- 2Approved this month — New ones, approved since your last application. These are the ones your payer will be checking.
- 3Net total of change orders — Calculated. Additions minus deductions — how much the job's value has moved since you signed. Add a matching line to your schedule of values so the two still agree.
The summary — where the money is decided
Nine numbered lines that turn everything above into one figure: what you're owed today. Only two of them are yours to type. The rest are arithmetic.
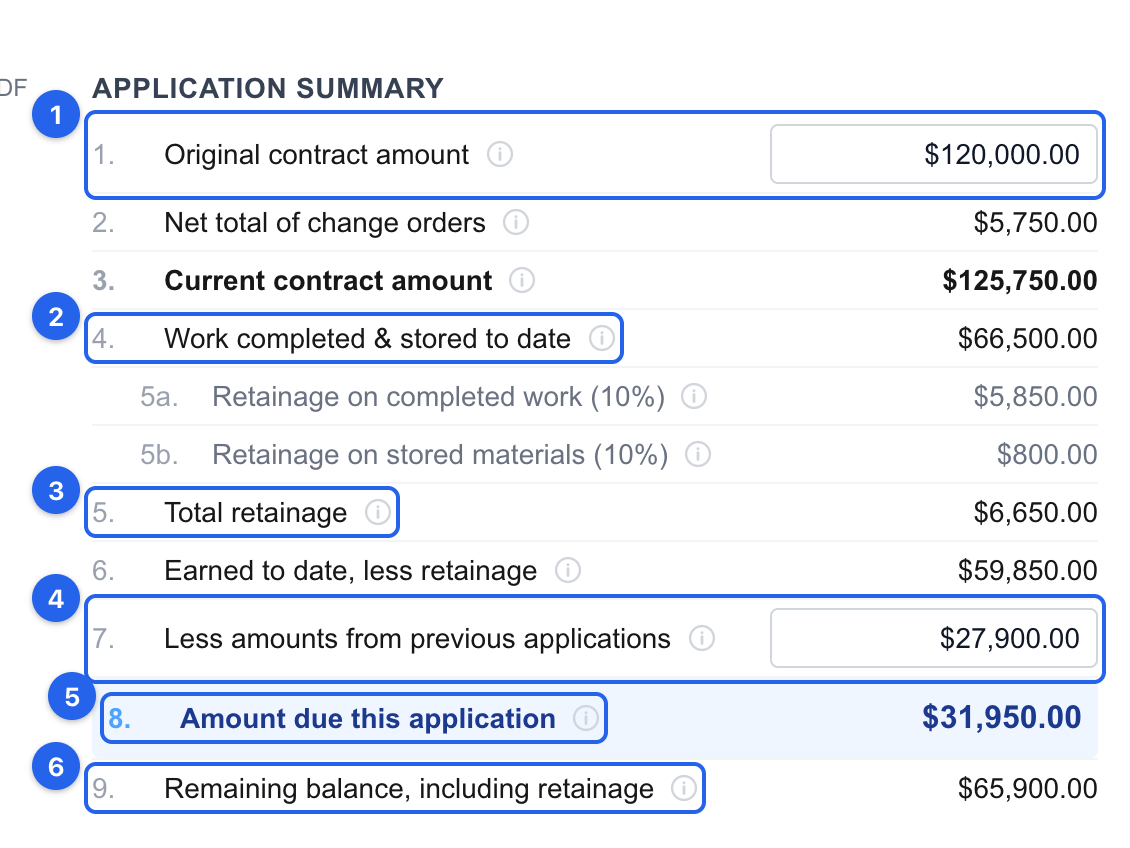
- 11. Original contract amount — You type this. The full value of the contract as signed, before any change orders. It should match the total of your schedule of values.
- 24. Work completed & stored to date — Calculated. Everything you've earned since the job started, from the schedule above. Not just this month — the running total.
- 35. Total retainage — Calculated. The slice being held back, using the rates you set earlier.
- 47. Less amounts from previous applications — What you have already been paid on this job. On a first application it's $0. When you carry an application forward here, the site fills this in for you — it adds the amount you just asked for to whatever was already there. You only type it yourself when you're starting here mid-job, and getting it wrong makes every figure below it wrong.
- 58. Amount due this application — Calculated. The answer — what you're asking for today. Earned so far, minus retainage, minus what you've already been paid.
- 69. Remaining balance, including retainage — Calculated. What's left to bill before the job is fully paid out. It counts work, not cash: it only goes down when you bill work, not when you get paid.
- Earned so far (line 4)
- $66,500.00
- Less retainage held (line 5)
- −$6,650.00
- Earned, less retainage (line 6)
- $59,850.00
- Less already paid (line 7)
- −$27,900.00
- Amount due this application (line 8)
- $31,950.00
Every number here except lines 1 and 7 came from the schedule of values. Fix the schedule and the summary fixes itself.
If your amount due comes out negative, the form is telling you it thinks you've been paid more than you've earned. Almost always that means the contract total was typed into line 7 instead of billing the work in the This Period column. A negative amount due isn't a bill — it reads as you owing money back.
Signing it
Underneath the numbers is the certification: your promise that the work you're billing for is really done. Whoever signs is standing behind that.

- 1Name — The person at your company who can vouch for the work — usually an owner or project manager.
- 2Title — Their job title, so the payer knows they're allowed to sign it.
- 3Date — The day it's being signed. Change this each month — a stale date is a common giveaway that last month's form was reused.
Two optional blocks sit near the signature. Notarization adds a notary's stamp area, needed only if your contract asks for it. The payer's certificate gives the person paying you a place to sign off on the amount. Both have an “Include on document” tick — leave them off if your job doesn't use them.
Starting in the middle of a job
If applications 1 to 6 went out on a spreadsheet and you want number 7 to come from here, the site has no way of knowing what happened on those first six. Two boxes carry that history, and both are yours to fill in this once:
- The “Previous” column on each schedule line — how much of that line you had billed before this application, added up across all those earlier months.
- Line 7, previous payments — the total you have actually been paid so far, which is usually less than the line above, because retainage was held back.
Get those two right once and you never touch them again: each following application carries them forward on its own.
The four mistakes that come up most
- Nothing in “This Period”. The form then asks for $0. Billing work is what creates the amount due — not typing the contract total somewhere.
- The contract amount typed into “previous payments”. This makes the amount due negative, which reads as you owing your payer money.
- The schedule not adding up to the contract. Every line's scheduled value, added together, must equal the contract amount plus any change orders.
- Last month's dates left in place. The period-to date and the signature date both move every month.
Frequently asked questions
- What do I put in “This Period” if I finished half of something?
- Half its scheduled value, in dollars. If the line is worth $62,000 and you finished half of it since your last application, type 31,000. The form works in money, not percentages — it calculates the percentage for you.
- It's my first application. What goes in the previous columns?
- Zero — if it's genuinely the job's first application. “Previous” and “previous payments” both mean earlier applications on this same job, and there aren't any yet. From your second application onward this site carries those figures forward automatically, so you won't type them again.
- I've been billing this job elsewhere. Do I still start at zero?
- No. The site can only carry forward from applications you made here, so the history has to be entered once by hand: the “Previous” column on each schedule line, and line 7 for what you've actually been paid. After that first one, every following application carries itself forward. The guided builder has a path for this that asks what your last application said.
- Why is my amount due negative?
- Because the form has been told you were already paid more than you've earned. Check line 7 (previous payments) against what you've actually billed in the schedule of values — usually the contract total was entered as a payment, or the work was never billed in the This Period column.
- Do I have to fill in every field?
- No. Via, project numbers, stored materials, notarization, and the payer's certificate are all optional, and whole sections can be switched off so they don't print. The ones that genuinely matter are the two party names, the period date, the contract amount, and what you completed this period.
- What if my job has no retainage?
- Set both retainage rates to 0, or switch the retainage section off entirely. Nothing will be held back and line 5 will read $0.00.